How to configure Full (Strict) SSL using Cloudflare Origin Certificates?
One of the greatest Cloudflare features is a wide range of SSL configurations. Starting from clever Flexible one and ending on Full (Strict) with trusted certificates.
In this short tutorial, I will show you how to generate Cloudflare Origin Certificates and configure SSL on the Apache and Nginx web servers. It won’t take more than 10-15 minutes. Let’s start!

After we will start make sure you have linked your domain with Cloudflare and you are using virtual hosts in Apache or blocs in Nginx web server.
Generate Origin Certificates
The first step is generating Origin Certificates that will be installed on your origin server to provide end-to-end encryption (SSL) for your visitors.
- Go to the „SSL/TLS” section and „Origin Server” tab
- Click on „Create Certificate”
- Left default options and click next (RSA certificate, valid 15 years)
- Left default certificate format -> PEM
- Copy keys to following files (on your computer or directly on the server)
– Origin Certificate to cert.pem (you can name it differently)
– Private Key to privkey.pem (you can name it differently)
– Download or copy cloudflare_origin_rsa.pem from this URL
Copy certificates to secure place
Now you need to decide where your certificates will be placed. Don’t put them in public_html and any other folder that can be accessed from the Internet. Make a separate directory for SSL certificates or place them on public_html level like below:
/etc/cloudflare/certificates/cloudflare_origin_rsa.pem
/etc/cloudflare/certificates/<domain_name>/cert.pem
/etc/cloudflare/certificates/<domain_name>/privkey.pem

or in your www directory

/var/www/origin_ca_rsa_root.pem
/var/www/<domain_name>/cert.pem
/var/www/<domain_name>/privkey.pem
Change Apache virtual host file
The next step is adding SSL support via port 443 to our virtual host file (located in /etc/apache2/sites-available). You can see it below, every connection on port 80 (http) will be redirected to port 443 (https).
You can use the provided virtual host file and only modify three parameters:
- Change <domain_name> to your actual domain name
- Change paths to files:
– SSLCertificateFile
– SSLCertificateKeyFile
– SSLCertificateChainFile - Make sure that the path in DocumentRoot is correct (path to web page main directory)
<VirtualHost *:80>
    Redirect permanent / https://<domain_name>/
    ServerName <domain_name>
</VirtualHost>

<VirtualHost *:443>
    ServerName <domain_name>
    DocumentRoot /var/www/<domain_name>/public_html
    ErrorLog ${APACHE_LOG_DIR}/error.log
    CustomLog ${APACHE_LOG_DIR}/access.log combined

    SSLEngine on
    SSLCertificateFile      /var/www/<domain_name>/cert.pem
    SSLCertificateKeyFile   /var/www/<domain_name>/privkey.pem
    SSLCertificateChainFile /var/www/origin_ca_rsa_root.pem

    SSLProtocol             all -SSLv2 -SSLv3
    SSLHonorCipherOrder     on
    SSLCipherSuite          ECDHE-ECDSA-CHACHA20-POLY1305:ECDHE-RSA-CHACHA20-POLY1305:ECDHE-ECDSA-AES128-GCM-SHA256:ECDHE-RSA-AES128-GCM-SHA256:ECDHE-ECDSA-AES256-GCM-SHA384:ECDHE-RSA-AES256-GCM-SHA384:DHE-RSA-AES128-GCM-SHA256:DHE-RSA-AES256-GCM-SHA384:ECDHE-ECDSA-AES128-SHA256:ECDHE-RSA-AES128-SHA256:ECDHE-ECDSA-AES128-SHA:ECDHE-RSA-AES256-SHA384:ECDHE-RSA-AES128-SHA:ECDHE-ECDSA-AES256-SHA384:ECDHE-ECDSA-AES256-SHA:ECDHE-RSA-AES256-SHA:DHE-RSA-AES128-SHA256:DHE-RSA-AES128-SHA:DHE-RSA-AES256-SHA256:DHE-RSA-AES256-SHA:ECDHE-ECDSA-DES-CBC3-SHA:ECDHE-RSA-DES-CBC3-SHA:EDH-RSA-DES-CBC3-SHA:AES128-GCM-SHA256:AES256-GCM-SHA384:AES128-SHA256:AES256-SHA256:AES128-SHA:AES256-SHA:DES-CBC3-SHA:!DSS

    <IfModule headers_module>
        Header always edit Set-Cookie ^(.*)$ $1;HttpOnly;Secure
        Header always set Strict-Transport-Security "max-age=15768000; includeSubDomains"
    </IfModule>
</VirtualHost>
Change Nginx block file
The next step is adding SSL support via port 443 to our block file (located in /etc/nginx/sites-available). You can see it below, every connection on port 80 (http) will be redirected to port 443 (https).
You can use the provided virtual host file and only modify three parameters:
- Change <domain_name> to your actual domain name
- Change paths to files:
– SSLCertificateFile
– SSLCertificateKeyFile
– SSLCertificateChainFile - Make sure that the path in root is correct (path to web page main directory)
server {
    listen 80;
    listen [::]:80;
    server_name <domain_name> www.<domain_name>;
    return 302 https://$server_name$request_uri;
}

server {
    listen 443 http2 ssl;
    listen [::]:443 http2 ssl;

    server_name <domain_name> www.<domain_name>;

    root /var/www/<domain_name>/public_html;
    index index.html index.htm index.nginx-debian.html;

    location / {
            try_files $uri $uri/ =404;
    }

    ssl_certificate /var/www/<domain_name>/cert.pem;
    ssl_certificate_key /var/www/<domain_name>/privkey.pem;
    ssl_client_certificate /var/www/origin_ca_rsa_root.pem;
}
Test configuration and restart web server
We are slowly getting to the end. The second to last step is verifying the virtual host configuration that we made in the previous step. Execute the following command to check configuration:
apachectl configtest
or
nginx -t
If you get „Syntax OK” everything went well and we can reboot the web server by executing the command:
service apache2 restart
or
service nginx restart
Probably there will be an error (too many redirections) if you will try to load your website. It’s normal if you have enabled Flexible SSL. Go to the next step, we will fix it!
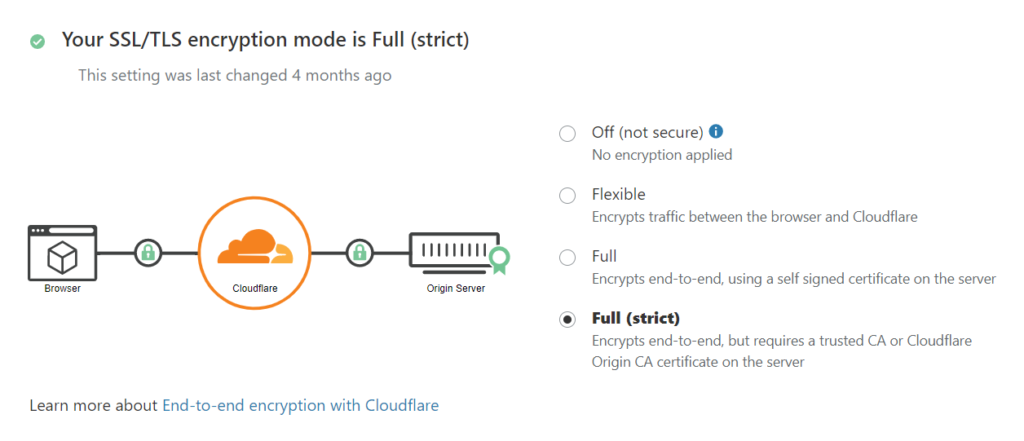
Enable Full (Strict) SSL
It’s time to go full throttle and enable Full (Strict) SSL in the „SSL/TLS” and „Overview” tab.
From now everything should be strictly secure and your web page will load normally. Test it and raise your fist in a gesture of triumph!
Summary
You configured your first strict SSL on Cloudflare. By doing that simple step you are ensured that all of the traffic to and from your website is encrypted. Everyone feels better when they see a green locker on the address bar, right?
If something is unclear or you faced some problems let me know in the comment sections.